

Moving out of a rental property can be a stressful process, but ensuring a smooth rental deposit return is entirely within your control. In today’s digital landscape, landlords and property managers frequently rely on clear documentation, timely communication, and professional standards to handle security deposits. As a tenant, you can leverage these expectations to safeguard your funds and walk away from your lease with confidence. This guide, updated for this year (2026), provides a comprehensive roadmap for tenants looking to maximize their deposit refund. From a careful review of lease provisions to a final walk-through, each step has been refined to address common pitfalls and optimize your strategy.
Throughout this article, you’ll find practical advice, external references to trusted sources, and actionable checklists designed to minimize deductions and streamline the move-out procedure. By following these proven techniques, you will not only protect your financial interests but also build a strong professional rapport with your landlord—an asset for future rentals. Let’s dive in and discover how to make your rental deposit return an effortless reality.
Understand Your Lease Agreement Inside Out
A thorough reading of your lease agreement is the foundation for a successful rental deposit return. Lease documents often include detailed clauses regarding deposit timelines, cleaning standards, repair obligations, and allowable wear and tear. Identifying these requirements early prevents surprises and helps you budget time and money effectively.
Identify Key Deposit Clauses
Begin by locating sections that specify how long the landlord has to return your deposit—commonly 14 to 30 days in many jurisdictions. Check for any mandatory cleaning or inspection deadlines, and note if professional services (such as carpet cleaning or pest control) are required. For authoritative guidance on state-specific regulations, visit the U.S. Department of Housing and Urban Development (hud.gov).
Clarify Ambiguities in Writing
If any clause is vague—such as what constitutes “normal wear and tear”—request clarification via email or certified mail. Written records of your inquiries and the landlord’s responses serve as vital evidence should a dispute arise. Save every communication in a dedicated folder, either digitally or physically.
Plan Your Budget and Timeline
Once you understand requirements, chart a timeline that aligns with your move-out date. Allocate funds for cleaning supplies, minor repairs, and any professional services recommended by your lease. Early preparation ensures you won’t be rushed and reduces the likelihood of omissions.
Document Property Condition with Precision
Maintaining an accurate record of your rental’s condition is pivotal in securing a full rental deposit return. Landlords may attempt to charge you for pre-existing marks, so you must establish a clear benchmark from day one.
Create a Move-In Inspection File
On your first day, perform a thorough walkthrough and photograph every room, surface, and fixture. Focus on walls, floors, appliances, windows, and outdoor spaces. Use a timestamped camera or mobile app that embeds date information into each file. For extra protection, email the photos to yourself and store backups on a secure cloud service.
Maintain Ongoing Records
Whenever you notice a new scratch, leak, or discoloration, snap a quick photo and note the date. This ongoing log demonstrates that you address minor issues promptly—strengthening your case against unfair deductions later.
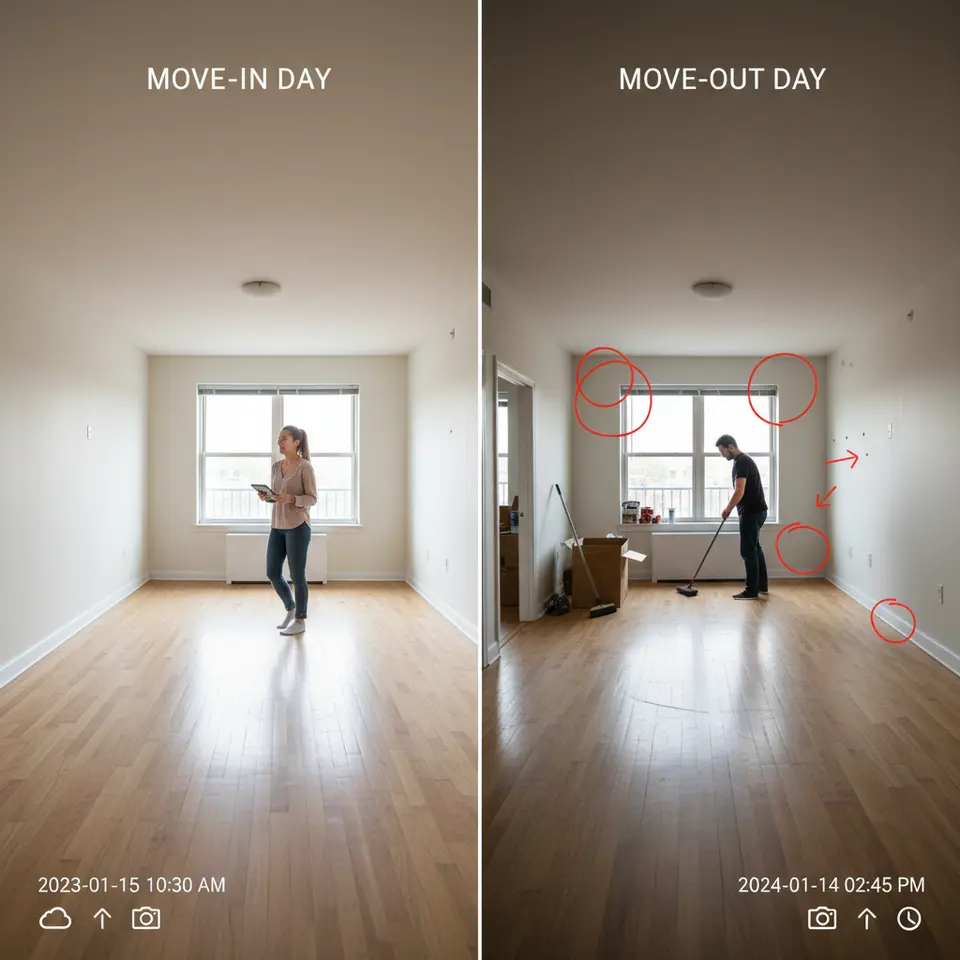
Conduct a Move-Out Comparison
Prior to vacating, replicate the initial inspection process. Compare move-in and move-out images side by side to confirm that any differences represent ordinary wear rather than tenant negligence. Presenting this visual evidence during the final walkthrough substantially increases your chances of a dispute-free deposit refund.
Communicate Proactively and Handle Repairs
Effective communication with your landlord is key to facilitating a seamless rental deposit return. Open, respectful dialogue about your plans and any maintenance concerns builds goodwill and reduces misunderstandings.
Provide Early Move-Out Notice
Inform your landlord of your intended move-out date at least 30 days beforehand. If your lease requires more notice, comply accordingly. This courtesy allows the landlord to schedule the final inspection and arrange for new tenants without feeling pressured.
Tackle Minor Repairs Promptly
Take responsibility for simple fixes such as tightening loose cabinet hinges, replacing light bulbs, and caulking minor gaps. Many landlords charge tenants for labor costs if these tasks are left undone. By addressing small repairs yourself, you demonstrate diligence and potentially reduce deductions.
Report Landlord Responsibilities in Writing
Should any major systems (HVAC, plumbing, structural issues) require attention, submit a written request for repair. Note the date and retain a copy. This record proves you acted in good faith and shields you if the landlord later claims neglect.
Execute Deep Cleaning or Hire Professionals

A pristine living space is one of the most effective strategies to guarantee your rental deposit return. While a DIY approach can suffice, professional services often deliver a certificate of completion that landlords respect.
Essential DIY Cleaning Checklist
- Vacuum and mop all floors, including behind appliances
- Wipe down baseboards, door frames, window sills, and light fixtures
- Clean kitchen appliances inside and out, including oven racks and refrigerator coils
- Scrub bathroom surfaces—tiles, grout lines, mirrors, and fixtures—with non-abrasive products
- Remove cobwebs from ceilings, vents, and corners
- Empty and disinfect trash containers and recycling bins
- Steam-clean carpets and upholstery to eliminate odors and stains
Benefits of Professional Cleaning
If your lease mandates a certified cleaning vendor, or if you simply want to ensure flawless results, hire a reputable service. Compare at least three quotes and verify references. Confirm that the company provides documentation listing tasks completed—this record can expedite your deposit return.
Professional services can also tackle specialized tasks such as pest control or deep grout restoration. While the upfront cost may be higher, the boost in credibility often pays dividends by preventing deposit disputes.
Complete Final Steps for a Hassle-Free Refund
The last mile of the move-out process often determines whether you receive your full rental deposit return. Paying attention to administrative details and maintaining a professional demeanor can tip the scales in your favor.
Hold a Pre-Move-Out Inspection
Schedule a preliminary walkthrough with your landlord or property manager roughly two weeks before moving. During this inspection, request feedback on any areas needing improvement. Address those issues promptly so your final visit goes smoothly.
Return Keys and Provide a Forwarding Address
Collect all keys, garage openers, and access cards and hand them over in a labeled envelope. Obtain a signed receipt to confirm the items have been returned. Additionally, share a reliable forwarding address and contact information for your security deposit check. Without this, landlords may delay refunds.
Follow Up in Writing
If the landlord fails to return your deposit within the timeframe outlined in your lease or local laws, send a polite written reminder. Reference the specific clause in your agreement and cite relevant state guidelines. For example, the Federal Trade Commission offers tenant resources at consumer.ftc.gov. Retain copies of all correspondence for your records.
Know Your Rights
Understanding tenant protections strengthens your negotiating position. Many states cap security deposit amounts, require interest payments, or mandate itemized damage statements. Consult your local housing agency or tenant rights organization to ensure compliance on both sides.
Maintain Professionalism Throughout
Politeness and cooperation go a long way toward a positive relationship and a timely deposit return. Express gratitude for your tenancy and offer a final walkthrough together. Small gestures—such as leaving a houseplant or a thank-you note—can leave a memorable impression.
FAQ
How do I ensure accurate documentation of the property condition?
Perform a thorough move-in walkthrough with timestamped photos of every room, surface, and fixture. Email images to yourself and back them up in the cloud. Maintain an ongoing log of any new marks or issues throughout your tenancy.
What qualifies as normal wear and tear?
Normal wear and tear generally includes minor scuffs on walls, slight carpet fading, or loose grout lines over time. Major stains, holes, and broken fixtures typically exceed normal wear and tear and may incur charges.
When should I notify my landlord before moving out?
Provide at least 30 days’ notice, or follow your lease’s specified timeframe. Early notification allows the landlord to schedule inspections and find new tenants without undue pressure.
Conclusion
Navigating the complexities of a rental deposit return doesn’t have to be daunting. By comprehensively reviewing your lease, meticulously documenting property conditions, communicating proactively, completing necessary repairs and cleaning, and handling final logistics with care, you position yourself for a seamless refund. In today’s competitive rental market, demonstrating professionalism and reliability benefits both tenants and landlords. Commit to these best practices, keep detailed records, and trust that your diligence will result in a full deposit return—plus the confidence of knowing you’ve executed each step correctly.


